What is Apache Tomcat? Instructions to download and install Tomcat
Introducing Apache Tomcat
What is Apache Tomcat?
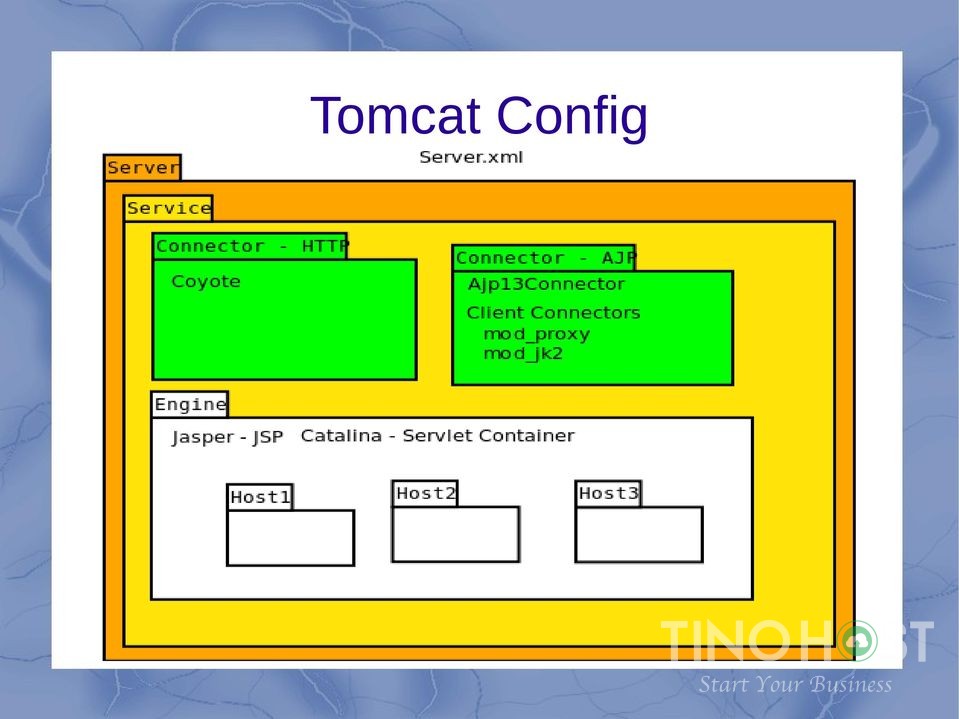
Apache Tomcat is an HTTP web server developed by the Apache Software Foundation that strongly supports Java applications instead of static websites. Therefore, Apache Tomcat can run many specialized versions of Java. Examples include Java Servlet, JavaServer Pages (JSP), Java EL, and WebSocket. Besides Java, users can use Apache Tomcat with many programming languages such as PHP , Python, Perl, ... Thanks to the help of the Apache module suitable, such mod_php, mod_python, mod_perl, ... After being written , Java web projects will be fully tested on localhost environment. From this environment, the developer will package this project into a war file and push it to the Tomcat Server to make it available to users.
Advantages of Apache Tomcat
High stability
Has all the features of a commercial web application
Apache Open Source
Some additional functions such as tomcat manager application, specialized realm implementation and tomcat valves.
Support operating systems such as windows, linux, Mac OS, BSD, etc.
The versions of Apache Tomcat coincide with the version and specification of the Java Servlet or Java servlet API.
For example, Tomcat 5.5X supports Servlet API 2.3, Tomcat 6.0X supports servlet API 2.4, Tomcat 7.0 supports servlet API 3.0. In addition to the Servlet versions API, the tomcat version supports the corresponding JSP API version.
Instructions for 3 ways to install Apache Tomcat
Install Apache Tomcat on Windows
Step 1: Download Tomcat: Go to https://tomcat.apache.org/ and select Downloads → select version of TomCat → “8.0.{xx}” → Binary Distributions → Core → “zip” package . Step 2: Install Tomcat: Proceed to extract Tomcat to the desired folder, you should not leave Tomcat on the Desktop, avoid confusion and limit errors during the installation process. Step 3: Start Tomcat: Find the bin folder in d:myprojecttomcat and run the startup.bat file . At this point, you have successfully installed Tomcat! Step 4: Configure Tomcat: The configuration files of Tomcat are saved in the conf . directory. There are four files for the configuration of Tomcat:
xml
web.xml
context.xml
tomcat-users.xml
To complete the configuration, you should shut down Tomcat and restart it by running two files: shutdown.bat and startup.bat respectively.
Install Apache Tomcat on Ubuntu Server
TinoHost works on Ubuntu 16.04 LTS, Ubuntu 17.10 and the latest Ubuntu 18.04 LTS version.
Install Java
First, enter the following command to check if the Java Development Kit (Open JDK) package is installed: sudo apt list --installed | grep jdk
Create an account for Tomcat
# Create group “tomcat” sudo groupadd tomcat # Create user “tomcat” sudo useradd -s /bin/false -g tomcat -d /opt/tomcat tomcat Here, we have created a user “tomcat” in group “tomcat” with home directory in /opt/tomcat. The -s /bin/false parameter means that this is a type of user that no one can log in to.
Install Apache Tomcat
Update permissions for Apache Tomcat installation directory
Set up running Tomcat
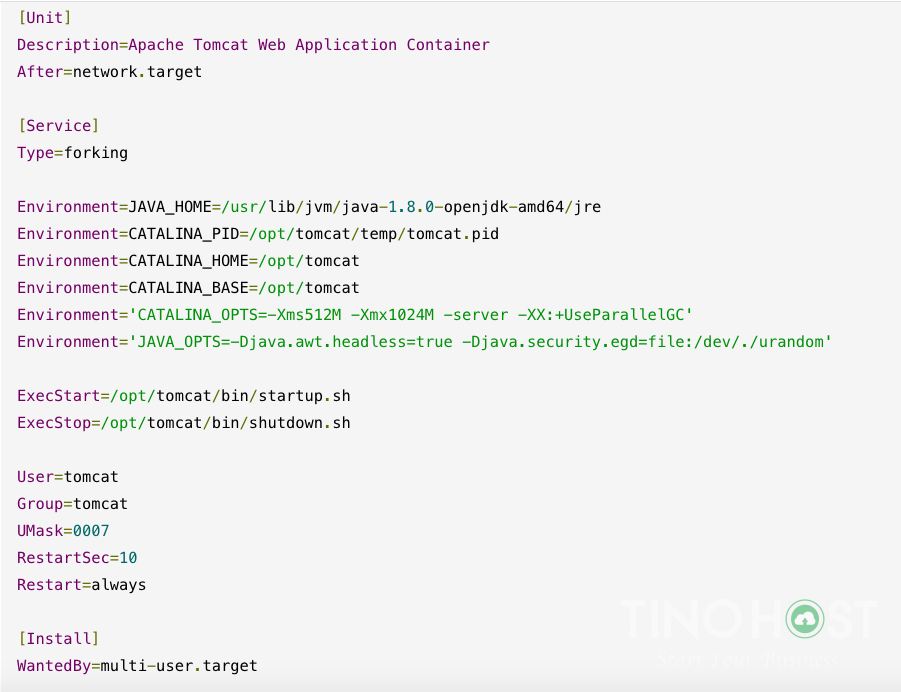
Tomcat needs to know where Java is installed. This path is often referred to as “JAVA_HOME”. The easiest way to find that location is to run this command: sudo update-java-alternatives -l Result: apache-tomcat-la-giCreate a new file /etc/systemd/system/tomcat.service with the following content:apache-tomcat-la-giWith the path JAVA_HOME found in the command above. Then, perform a reload of the Systemd Daemon, so that Systemd recognizes the service you just created. sudo systemctl daemon-reload Start Apache Tomcat sudo systemctl start tomcat Check if Apache Tomcat is enabled? sudo systemctl status tomcat Test working You can get to the correct interface by entering your server domain name or IP address on port 8080 in your browser: https://localhost:8080
Install Apache Tomcat on CentOS
Root login
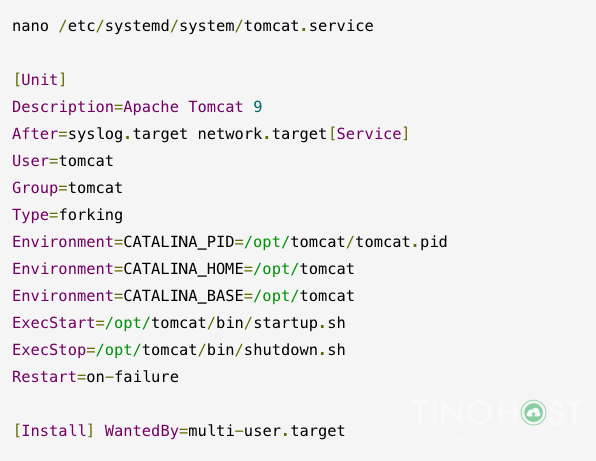
Login to your CentOS 7 VPS via SSH as the root user Update to the latest versions of all packages In this article, TinoHost will guide you through the installation of Apache Tomcat 9, you should update Java 8 to install successfully placed. Download the latest version of Apache Tomcat from the Apache Tomcat homepage. Or you can use your browser to go to http://ftp.wayne.edu/apache/tomcat/ to find the latest version of TomCat. Unzip the downloaded zip file Note check the file name if you download the latest version. At this point, you have created a new folder named 'apache-tomcat-9.0.26.zip'. Run the following commands to set the CATALINA_HOME environment variable It is not recommended to run Apache Tomcat on the root account, create a new system user to run the tomcat server ssh root @ IP _Address -p7022 yum -y updatewget http://ftp.wayne.edu/apache/tomcat/tomcat-9/v9.0.26/bin/apache-tomcat-9.0.26.zipunzip unzip apache-tomcat-9.0.26.zip -d /optcd /opt mv apache-tomcat-9.0.26/ tomcatecho "export CATALINA_HOME='/opt/tomcat/'" >> ~/.bashrc source ~/.bashrcuseradd -r tomcat --shell / bin / false Change ownership of all Tomcat files chown -R tomcat: tomcat / opt / tomcat / Create a systemd file with the following content:apache-tomcat-la-giSave the file and run the following command to reload the systemd manager configuration systemctl daemon-reload
Configure Tomcat 9
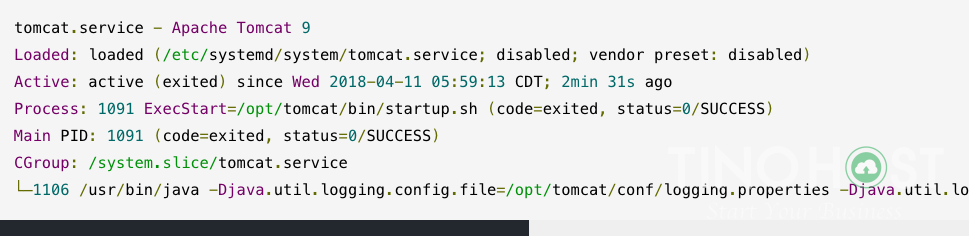
Start the Apache Tomcat server 9 Check the status of the Tomcat 9 server: Output: You can now access the Tomcat server in your favorite web browser. Apache Tomcat by default listens to port 8080.So, open your browser and navigate to http://IP_address:8080, you will see the Apache Tomcat homepage. Good luck with your installation! systemctl start tomcat systemctl enable tomcatsystemctl status tomcat
Frequently asked questions about Apache Tomcat
Why I failed to install Apache Tomcat 9?
Apache Tomcat 9 needs Java 8 to install successfully. If your system does not have Java 8 installed, install Java 8.
Which Tomcat version should I choose?
You should choose the version released earlier. They will be more stable and less buggy than the latest version.
How to install 4 files to support Tomcat configuration?
There are four files for the configuration of Tomcat: 1. xml: TCP port number configuration. The default TCP port configured in Tomcat is 8080, we can completely change this parameter between 1024 and 65535 like the code below: 2. web.xml 3. context.xml 4. tomcat-users .xml : To enable the management feature of Tomcat,